Instructions for ConvertDGN2ArcGIS
ConvertDGN2ArcGIS is an application that runs inside of MicroStation. The app processes and writes new design files so that they can be used with ArcGIS. Here are the steps needed for both consultants and KYTC employees to convert a design file.
-
Export the plan sheets and coordinate control sheet design files from ProjectWise to a folder on your workstation or U drive.
This tool will modify the original design files.
Consultants should copy their design files to a new folder.
-
Open the coordinate control sheet design file in MicroStation and note the Project Datum Factor (if one is applicable) as well as the projected coordinate system (KY North/South/Single Zone) for the project.
-
Open a MicroStation design file from ProjectWise that has the correctly associated workspace assigned (this should be a design file within the project).
Consultants will just need to make sure they are using the
KYTC CADD Standards Workspace.
-
Start the
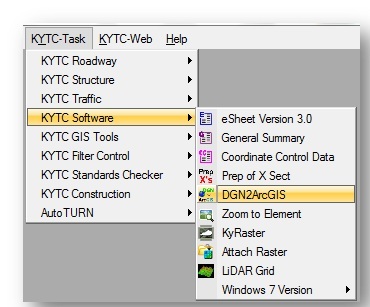
ConvertDGN2ArcGISapplication from within MicroStation.

-
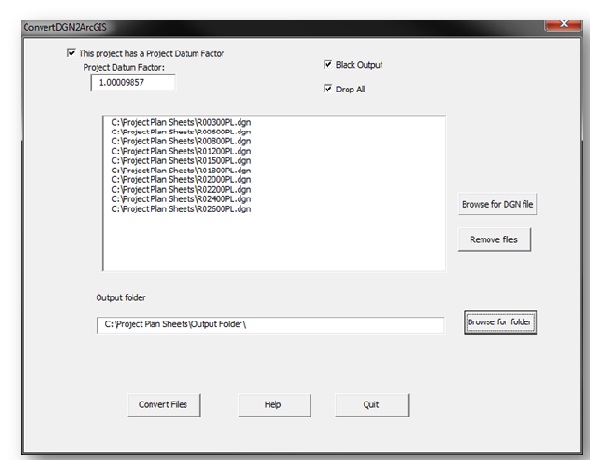
If there is a Project Datum Factor, check the box for
This project has a Project Datum Factor and enter the value into the
Project Datum Factor: text box.
-
If you wish to convert all the graphics and text to be black when brought into ArcGIS, turn on the
Black Outputcheck box (This is generally used for building a CarryMap application for use on an iPad).
-
By turning on the
Drop All check box, the following will happen:
-
All custom linestyles will be dropped to MicroStation graphical elements.
ArcGIS can read all MicroStation graphical elements, but it does not know how to read KYTC custom linestyles
-
Cells will be dropped
-
Curves and B-splines will be Fillet to very short line segments to represent the curves
Notes:
Dropping these elements allows a design file to look the same when brought into ArcGIS.
-
Select all of the design files (plan sheets) that are to be converted (see step 1 of this document) by clicking the
Browse for DGN file button.
-
Select the output folder by clicking the
Browse for folderbutton. This is where the converted design files will end up after all files are converted.
-
Click the
Convert Files button.
-
When the conversion is done (A dialog box will appear saying the conversion is done), click the
Quit button and close MicroStation.
Note:
The orginal files have been modified.
So if this process is to be ran again, you should recopy the original files.

-
Open ArcMap and find the Working with CAD data toolbox
For KYTC users, you can find this here:
S:\Models\Working with CAD\Working with CAD Data Toolbox.tbx
For Consultants, you can find this here:
C:\KYTC_CADD_Standards\KYTC_Resource\Data\Working with CAD Data Toolbox.tbx
-
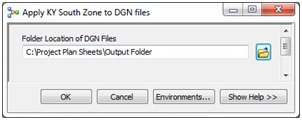
In ArcMap, use the appropriate tool to set the projected coordinate system to the same zone that was noted from the coordinate control sheet.

-
Once you run the tool, browse to the folder that has the output design files (refer to step 9).
Click OK.

-
Finally, Add the converted design files to the map and any other data to finish your map.
